
Blog
Ultimate Soundproof Drum Box Pro Guide: Build Your Silent Practice Space
Are you tired of noise complaints interrupting your drum practice? Imagine being able to play your drums anytime, day or night, without worrying about disturbing family, roommates, or neighbors. With the right setup, you can enjoy uninterrupted practice sessions in complete peace.
This guide offers a step-by-step blueprint to help you build your own soundproof drum box—a personal sanctuary where you can perfect your skills without stress. You can even consider similar solutions like soundproof pods for home if you prefer pre-made options.
Is Drum Noise Causing Trouble at Home?
If the sound of your drums is causing issues at home, it’s time to take control! Discover how to use an effective and affordable DIY soundproof drum box, allowing you to practice anytime without disturbing anyone. This comprehensive guide will walk you through each step, helping you create a quiet, personalized space where you can focus on your drumming.
Understanding the Drum Noise Dilemma and the Power of Soundproofing
The Rhythmic Roar: Understanding the Drum Noise Dilemma
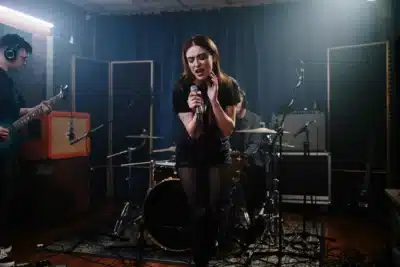
For many drummers, the rhythmic roar of their instrument is a source of joy and creative expression. However, in apartment complexes, shared houses, and close-knit neighborhoods, that same sound can become a source of stress and frustration. The challenges of drum noise are all too real, especially when you’re trying to practice or perform without disturbing others.
Drum noise does not just affect the drummer; it often impacts family members, roommates, and neighbors who may not share the same passion for the beat. From the deep thrum of bass drums to the sharp snap of snare hits, the sound can seep through walls, floors, and ceilings, causing tension and complaints.
For drummers, this can mean limited practice time, having to adjust their schedules, or feeling discouraged from playing at all. Noise complaints can impose serious restrictions on a drummer’s passion, limiting their ability to progress and enjoy their craft freely. Soundproofing, however, offers a solution, allowing drummers to reclaim their space and practice without worry.
Why Soundproofing is a Game-Changer for Drummers
Soundproofing offers numerous benefits…For office environments needing quiet spaces, consider exploring
soundproof pods for office to boost productivity
- Unrestricted Practice: Play at any time, day or night, without worrying about disturbing others.
- Enhanced Focus & Creativity: Free from external noise distractions, you can fully immerse yourself in your music.
- Better Relationships: Maintain harmony with housemates and neighbors by keeping the noise contained.
- Home Recording: Home Recording: Create professional-quality recordings without outside noise interference. For dedicated audio work, a soundproof booth for podcasting can offer even better acoustic control.
- Long-Term Investment: Soundproofing is not just a solution—it’s an investment in your musical journey and mental well-being, helping you practice and perform with peace of mind.
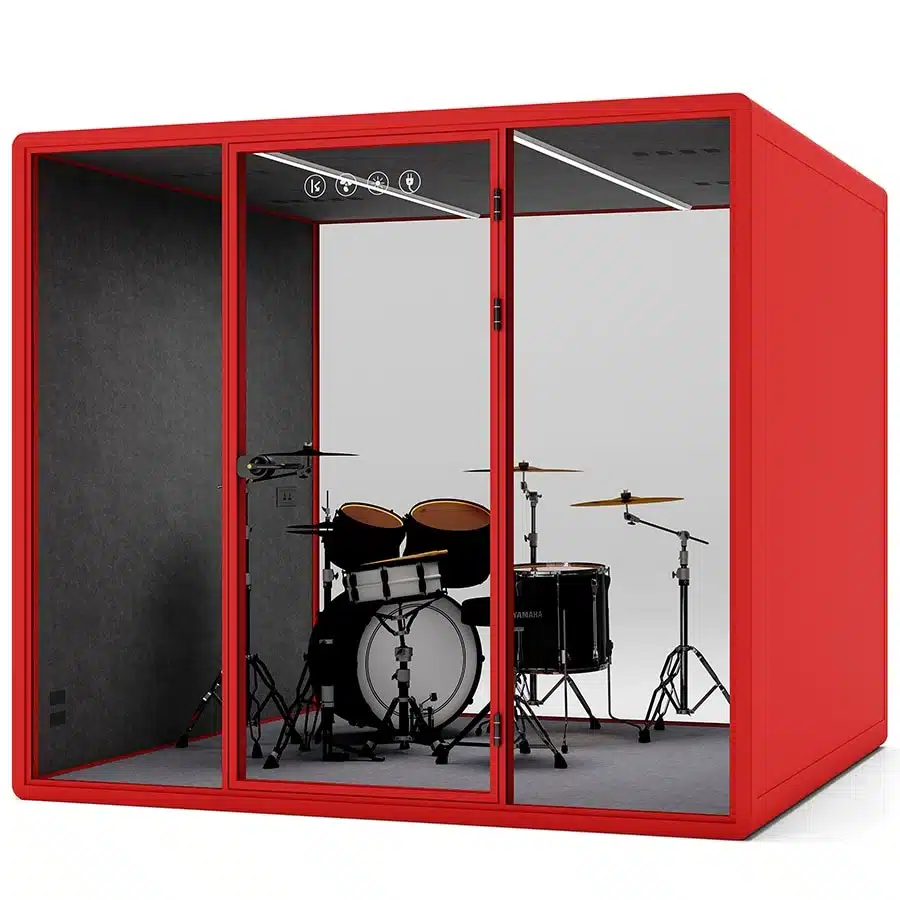
Introducing the DIY Soundproof Drum Box: Your Silent Sanctuary
The DIY soundproof drum box is the perfect, cost-effective solution for drummers struggling with noise issues. This simple yet powerful setup helps reduce sound transmission, allowing you to practice freely without disturbing those around you.
A soundproof drum box is designed to create a quiet practice space. For quick calls, consider soundproof phone booth options for focused conversations. Using materials that block or dampen sound, it creates a quiet practice space where you can play without worry.
In this guide, we’ll provide step-by-step instructions and expert tips to help you build a soundproof drum box that works. Get ready to transform your practice space into a peaceful sanctuary!
Decoding Soundproofing: Essential Principles for DIY Drummers
The Basics of Acoustics: Sound Transmission, Absorption, and Damping
- Sound Transmission: Sound travels through air and materials when you hit your drums. The louder the sound, the further it travels. Thicker walls or materials block sound better, preventing it from escaping your drum box.
- Sound Absorption: Just like a sponge soaks up water, sound-absorbing materials (like acoustic foam) soak up sound energy. This reduces echoes and prevents sound from bouncing off walls inside your drum box.
- Sound Damping: When you hit your drums, vibrations spread through the surfaces around you. Materials like Green Glue and Mass Loaded Vinyl (MLV) help absorb these vibrations, keeping them from traveling through walls or floors and minimizing noise.
Why DIY Soundproofing Works: Applying Principles to Your Drum Space
- Connect the basic acoustic principles to the practical application of building a soundproof drum box.
- Mass Loaded Vinyl (MLV): This dense material blocks sound transmission by adding mass to your drum box, preventing sound from passing through walls and surfaces.
- Acoustic Foam: Designed to absorb sound, acoustic foam reduces reflected sound waves inside the box, minimizing echoes and preventing noise from bouncing out.
- Green Glue: This damping compound absorbs vibrations and helps prevent resonance from spreading through the structure, ensuring the sound stays contained.
Even professional solutions like Drum Box Pro can be incredibly effective. Explore various pre-built soundproof boxoptions for quicker setup. Using the right materials ensures optimal noise reduction, giving you a quieter and more focused drumming experience.
Debunking Common Soundproofing Myths for Drummers
- Address common misconceptions about soundproofing, such as:
- “Egg cartons are effective soundproofing.” (Myth: They are not)
- “Soundproofing is only for professionals.” (Myth: DIY is possible and effective)
- “You need to completely eliminate sound.” (Myth: Significant reduction is often sufficient)
Planning Your Soundproof Drum Box: Design and Material Selection
Assessing Your Needs and Space: Size, Drum Kit, Location
When planning your soundproof drum box, consider different designs. Beyond DIY, pre-fabricated soundproof office pods offer professional solutions for various needs
- Measure Your Drum Kit Footprint: Start by measuring your drum kit’s size to ensure the box will comfortably fit your setup. Don’t forget to account for extra space to move around or make adjustments while playing.
- Assess Available Space: Choose a location in your home or studio where the box can be set up easily. Make sure the area is large enough for both the drum box and any potential future adjustments.
- Consider Height Requirements: If you use tall cymbals or have a specific drumming style, make sure your drum box is tall enough to accommodate your playing style and equipment placement comfortably.
Expert Tip: Begin with a detailed plan and precise measurements to avoid surprises during the building process. A well-thought-out design ensures a smoother and more effective soundproofing result.
Design Considerations: Basic vs. Advanced Box, Ventilation
- Present options for basic and advanced soundproof box designs to cater to different budgets and noise reduction needs.
- Basic Box: Simpler construction, focusing on core soundproofing materials for good noise reduction.
- Advanced Box: More complex construction, incorporating decoupled layers, enhanced ventilation, and premium materials for maximum sound isolation.
- Expert Tip: Consider incorporating ventilation!
- Emphasize the importance of ventilation within a soundproof box to prevent overheating and maintain air quality during practice sessions.
- Suggest simple ventilation solutions like small fans or passive vents, especially for enclosed boxes.
Material Selection: Choosing the Right Soundproofing Components
When building a soundproof drum box, selecting the right materials is essential to achieving effective noise reduction. Here’s a breakdown of the key components:
- Plywood or MDF Boards: These materials are ideal for constructing the box frame and walls due to their rigidity and ease of use. They are dense enough to block some sound but also versatile for building the structure. You can choose between different thicknesses, but thicker boards generally offer better soundproofing—though they come at a higher cost.
- Mass Loaded Vinyl (MLV): MLV is crucial for reducing sound transmission. Its high density blocks sound waves effectively, enhancing isolation by preventing noise from escaping. When choosing MLV, select a thickness and density suited to your drum box—typically, 1/8″ to 1/4″ thickness offers a good balance between soundproofing and cost.
- Acoustic Foam: Acoustic foam helps absorb sound reflections inside the box, minimizing reverberation and improving sound quality. Types like wedge or pyramid foam are especially effective at absorbing mid-to-high frequencies. Place foam strategically on walls and the ceiling of the drum box to maximize sound absorption and reduce unwanted echoes.
- Green Glue: Green Glue is a damping compound that absorbs vibrations and minimizes sound transmission between layers of material. Apply it between layers of plywood or MDF for enhanced sound isolation. It’s typically used in a 2-3 tubes per 4×8-foot panel for maximum effectiveness.
Expert Tip: Prioritize sealing all gaps and cracks! Airtight seals are critical in soundproofing. Use weather stripping around doors and access points to prevent leakage, and apply acoustic sealant to fill any gaps or seams in the box structure. A well-sealed drum box will significantly enhance your soundproofing results.
By carefully selecting and layering these materials, you can create a highly effective soundproof drum box tailored to your needs.
Tools You’ll Need: Essential Toolkit
- List the essential tools needed for building a DIY soundproof box, categorized by basic and advanced levels.
- Basic Tools: Saw, drill, measuring tape, utility knife, screwdriver, staple gun.
- Advanced Tools (Optional): Power saw, circular saw, jigsaw, nail gun (for faster construction).
- Suggest safety gear like safety glasses, gloves, and a dust mask.
Step-by-Step DIY Soundproof Box Construction Guides
Option 1: The Basic Budget-Friendly Drum Box
Provide a detailed, step-by-step guide for building a basic soundproof drum box, focusing on cost-effectiveness and ease of construction.
- Instructions on building a simple wooden frame using plywood or MDF for the box structure.
- Detailed measurements and cutting guidelines for frame components.
- Guide on attaching Mass Loaded Vinyl to the inside of the frame to create a sound barrier layer.
- Tips for proper MLV installation, including overlapping seams and secure fastening.
- Instructions on applying acoustic foam panels to the interior walls and ceiling of the box for sound absorption.
- Suggestions for strategic foam placement to maximize effectiveness.
- Steps for sealing gaps and seams using weather stripping and acoustic sealant for airtight construction.
- Instructions for creating a door or access point with proper sealing.
Option 2: The Advanced Sound Isolation Drum Box
- Present a more advanced step-by-step guide for building a high-performance soundproof drum box, incorporating advanced techniques for maximum isolation.
- Build a decoupled frame using a “box-within-a-box” approach to minimize vibration transmission.
- Instructions on creating inner and outer frames with isolation gaps.
- Constructing multi-layer walls by sandwiching MLV and Green Glue between layers of plywood or MDF.
- Benefits of this layered approach for enhanced sound damping and isolation.
- Expert Tip: Experiment with different acoustic foam placements!
- Provide advanced strategies for acoustic treatment inside the box, including using different densities and types of foam.
- Suggest considering bass traps for corner placement to manage low-frequency sounds.
- Detailed instructions on integrating a ventilation system into the advanced soundproof box design.
- Options for active ventilation (fans) or passive ventilation (sound-dampened vents).
- Emphasize professional-grade sealing techniques for maximum airtightness in advanced construction.
- Suggest optional final changes for aesthetics and durability.
Essential Soundproofing Materials & Tools: Product Reviews and Recommendations
Mass Loaded Vinyl (MLV) Review: Pros, Cons, and Best Uses
- Detailed review of Mass Loaded Vinyl (MLV) as a soundproofing material.
- Pros: High density, effective sound barrier, flexible.
- Cons: Can be heavy and expensive.
- Best Uses: Walls, ceilings, floors, soundproof boxes.
Acoustic Foam Panels Review: Types, Effectiveness, and Placement
- In-depth review of Acoustic Foam Panels for sound absorption.
- Types: Wedge, pyramid, convoluted, etc.
- Effectiveness: Reduces reverberation, improves sound clarity inside the box.
- Placement: Walls, ceilings, corners.
- Guide on choosing the right type and density of acoustic foam for drum soundproofing.
Green Glue Noise Proofing Compound Review: Application and Benefits
- Review of Green Glue Noise Proofing Compound as a damping solution.
- Application: Between layers of rigid materials.
- Benefits: Reduces vibration and sound transmission effectively.
- Explain proper application techniques for Green Glue.
Weather Stripping and Acoustic Sealant Review: Choosing the Right Sealants
- Comparison of different types of weather stripping and acoustic sealants.
- Weather Stripping: For doors and movable parts.
- Acoustic Sealant: For gaps and seams.
- Guide on selecting suitable products for airtight sealing in soundproof box construction.
Essential Tools for Soundproofing: From Basic to Advanced
- List and briefly review essential tools for DIY soundproofing projects.
- Highlight must-have tools and optional tools for efficiency.
- Suggest reputable brands and tool types for durability and performance.
Cost Analysis and Budgeting for Your Soundproof Box
| Item | Basic Soundproof Drum Box | Advanced Soundproof Drum Box |
| Material Costs | ||
| Wood (Plywood or MDF) | $100–$150 | $150–$250 |
| Mass Loaded Vinyl (MLV) | $150–$250 | $250–$400 |
| Acoustic Foam | $50–$150 | $150–$300 |
| Green Glue | $30–$60 | $30–$60 |
| Sealants & Weather Stripping | $20–$40 | $40–$60 |
| Total Material Costs | $300–$500 | $500–$900+ |
| Tool Costs | ||
| Power Tools (if needed) | $50–$200 | $50–$200 |
| Tool Rental (if applicable) | $30–$50 per day | $30–$50 per day |
| Time Investment | ||
| Planning | 3–5 hours | 3–5 hours |
| Building the Box | 10–15 hours | 10–15 hours |
| Finishing Touches | 5–10 hours | 5–10 hours |
| Total Estimated Time | 18–30 hours | 18–30 hours |
This table provides a clear overview of the costs and time investment needed for building both basic and advanced soundproof drum boxes.
Budget-Friendly vs. Premium Soundproofing: What to Expect at Each Price Point
Budget-Friendly vs. Premium Soundproofing: What to Expect at Each Price Point
| Feature | Budget-Friendly Soundproof Box | Premium Soundproof Box |
| Noise Reduction | Provides good noise reduction but may have some leakage or less effective isolation in very noisy environments. | Offers superior sound isolation with highly effective materials that minimize noise transmission to a very low level. |
| Materials | Basic materials like MDF, low-density MLV, and standard acoustic foam. | High-density MLV, premium acoustic foam, and advanced damping compounds like Green Glue for maximum soundproofing. |
| Sound Quality | Decent sound quality inside the box, but may still have minor reverberation or echoes. | Excellent sound quality with reduced reverberation, creating a cleaner and more focused sound. |
| Durability & Build Quality | Simple construction that may wear out quicker over time, and may not be as aesthetically pleasing. | High-quality build with longer-lasting durability and often more refined aesthetics. |
| Cost | $300–$500 | $500–$900+ |
Budget-Friendly Options:
- Performance: Provides effective soundproofing for most casual drummers and home practice setups. However, some sound leakage may occur in extreme cases.
- Limitations: The materials used might not provide the highest level of isolation, and the box could have more echoes or minor noise bleed.
Premium Options:
- Performance: Superior sound isolation with advanced materials and design. These boxes block almost all external noise and create a very quiet, isolated practice space.
- Value: The higher cost is justified by enhanced sound quality, greater durability, and professional-grade performance. Ideal for serious drummers, recording musicians, or those in noise-sensitive environments.
In short, budget-friendly boxes are a solid choice for everyday use, while premium options offer top-tier performance, better acoustic quality, and long-lasting results for those seeking the best soundproofing experience.
Tips for Saving Money on Your Drum Soundproof Box
- Offer practical tips for reducing the cost of a DIY soundproof drum box project.
- Expert Tip: Test basic soundproofing principles with cheaper materials first!
- Suggest using reclaimed or recycled materials where possible.
- Recommend purchasing materials in bulk for potential discounts.
- Advise on prioritizing essential materials and features to stay within budget.
Is DIY Soundproofing Cheaper Than Professional Solutions?
- Compare the cost of DIY soundproof boxes to professional soundproofing services or pre-built soundproof rooms.
- Emphasize the significant cost savings of DIY for drummers willing to invest time and effort.
Troubleshooting, Optimization, and Acoustic Treatment for Peak Performance
Common DIY Soundproofing Mistakes and How to Avoid Them
- Identify common errors drummers make when building DIY soundproof boxes and provide solutions.
- Inadequate sealing of gaps and cracks.
- Insufficient use of soundproofing materials.
- Ignoring ventilation needs.
- Overlooking internal acoustics.
Optimizing Sound Isolation: Identifying and Sealing Sound Leaks
- Guide readers on how to identify and locate sound leaks after building their box.
- Reiterate the importance of meticulously sealing any remaining gaps or cracks to maximize sound isolation.
- Suggest using smoke or sound tests to pinpoint leaks.
Improving Internal Acoustics: Reducing Reverb and Standing Waves
- Provide further tips on optimizing the internal acoustics of the soundproof box.
- Expert Tip: Experiment with different foam placements!
- Suggest adjusting acoustic foam placement and density to fine-tune sound absorption.
- Recommend adding bass traps in corners to address low-frequency issues.
Advanced Techniques: Floating Floors, Decoupled Walls
- Advanced soundproofing techniques for further enhancing isolation (for more dedicated users).
- Floating floors: Reducing vibration transmission through the floor.
- Decoupled walls: Creating air gaps and isolated layers to minimize sound transfer.
- Mention these as potential upgrades for users seeking maximum soundproofing in the future.
Safety First: Essential Precautions During Construction
Essential Safety Gear: Protecting Yourself During Construction
- Importance of wearing appropriate safety gear during the DIY building process.
- Safety glasses: To protect eyes from dust and debris.
- Gloves: To protect hands from splinters and materials.
- Dust mask or respirator: To avoid inhaling dust and particles.
- Hearing protection: When using power tools.

Safe Handling of Soundproofing Materials and Tools
- Provide guidelines for safely handling soundproofing materials like MLV and Green Glue.
- Offer tips for the safe use of power tools and hand tools during construction.
- Stress the importance of following tool manuals and safety instructions.
Ventilation and Air Quality Considerations
- Reiterate the importance of ventilation not only for comfort but also for safety and air quality inside the enclosed soundproof box.
- Advise on ensuring adequate airflow to prevent buildup of fumes from materials or overheating.
Testing Your Soundproof Box & Measuring Results: Data-Driven Sound Reduction
When it comes to soundproofing your drum box, it’s important to understand how effective your setup is. This can be done through data-driven measurements, using tools that track sound reduction. One simple and accessible way to gauge this is by using sound level meter apps available for smartphones.
Introduction to Sound Level Meter Apps: Measuring Decibel Reduction
Sound level meter apps are easy-to-use tools that let you measure the decibel (dB) levels of sound in your environment. These apps work by using the built-in microphone of your smartphone to capture the volume of sound and display it in decibels. While they may not offer the precision of professional-grade equipment, they provide a useful and practical way to monitor the effectiveness of your soundproof drum box. These apps are perfect for getting a quick idea of how much noise reduction you’ve achieved and can guide you in adjusting your setup for better results.
Step-by-Step Guide to Testing Your Soundproof Box with a Sound Level App
Testing the effectiveness of your DIY soundproof drum box is essential to ensure you’re reducing noise to an acceptable level. Here’s a simple, step-by-step guide on how to use a sound level meter app to test your soundproof box.
1. Download and Install a Sound Level Meter App
First, find and install a reliable sound level meter app on your smartphone. Popular options include Decibel X, NIOSH Sound Level Meter, or Sound Meter. These apps are available for both iOS and Android devices.
2. Prepare the Testing Area
Set up your soundproof box in a quiet environment. Ensure that no external sounds interfere with the measurements. Place your phone at the location where you intend to measure the sound (e.g., a few feet away from the box).
3. Set a Consistent Drumming Volume
Inside the soundproof box, play the drums at a consistent volume level. It’s important to maintain the same intensity for all test runs to ensure accurate results. This could mean using a metronome or practice pad to stay on track with the volume.
4. Position the Microphone
Position the phone’s microphone just outside the soundproof box, at the same height and distance from the box each time you perform a test. Ensure the microphone is not obstructed by any objects to avoid inaccurate readings.
5. Measure the Sound Outside the Box
With your phone ready, start the app and let it measure the sound levels. Record the decibel reading while the drums are being played. Take note of this baseline reading.
6. Repeat the Test
For more reliable results, repeat the test a few times. You can also vary the drumming style (e.g., softer beats versus louder strikes) to measure the box’s effectiveness under different conditions.
7. Compare the Results
After gathering your data, compare the decibel readings taken inside and outside the box. The difference in dB levels will give you a clear understanding of how much sound reduction the box is providing.
8. Make Adjustments
If the sound reduction isn’t as significant as you’d like, consider adding more soundproofing material or adjusting the placement of your box. Re-test after making changes to track improvements.
By following these steps, you can effectively measure the performance of your soundproof drum box and make data-driven adjustments to create the perfect practice environment.
Interpreting Your Results: What Does the Decibel Reduction Mean?
| Decibel Range | Meaning | Impact on Perceived Loudness |
| 0–10 dB Reduction | Minimal reduction; sound is still quite noticeable. | Little change; sound is still audible, though slightly quieter. |
| 10–20 dB Reduction | Moderate reduction; sound is significantly softer. | 50%–90% quieter, noticeable difference, but still audible in quiet settings. |
| 20–30 dB Reduction | Significant reduction; noise is much less intrusive. | 90%–99% quieter; sound is barely noticeable outside the box. |
| 30+ dB Reduction | Excellent reduction; sound is very well-muffled. | Almost silent to external listeners, ideal for creating a “silent” practice sanctuary. |
Your Silent Drumming Journey Begins: Take Action Now!
Your Silent Drumming Journey Begins: Recap of Key Takeaways
Building a DIY soundproof drum box offers numerous benefits for drummers, such as reducing noise for neighbors, improving practice time flexibility, and creating a quieter environment for focused play. Here’s a quick recap of the main points covered:
- Key Benefits: A DIY soundproof drum box can significantly lower external noise, allowing you to practice without disturbing others. It also gives you the flexibility to practice at any time, day or night.
- Main Steps: We’ve walked you through choosing materials, constructing the box, and using a sound level meter app to test and measure sound reduction. Additionally, we highlighted how to interpret the results and make adjustments for the best performance.
- Silent Practice is Achievable: With the right materials, setup, and testing, you can create a quiet practice space. Achieving a significant sound reduction is within reach, ensuring you can practice freely without worrying about noise interference.
Your silent drumming sanctuary is now closer than ever—ready to enjoy quiet practice sessions!